Adding/Managing personal presets
A complete overview of how to add and manage your own personal presets.
The "Add Preset" panel

Picking up from where we left off in the last lesson, the add presets panel is where you would add your custom album presets for repeat use in Canvas Creator. To create a new preset, follow these steps:
1) Description Text - This is the text you would use to give your preset a title. This is what you will see when finding your preset in Canvas Creator (it can be anything)
2) Width - Set the width that you would like your canvas to be.
3) Height - Set the height that you would like your canvas to be.
4) Resolution - Sets the resolution of your canvas when it is created. (for example, many labs are 240 or 300)
5) Units - Set the definied unit that Photoshop will use to create your canvas. All of the default Photoshop units are included (INCHES, MM, PIXELS)
6) Colour Mode - Set the color space you would like to use for your canvas. Choose between RGB or CMYK.
7) Click Add New Preset to create the preset and start a new one.
Using the presets you just created

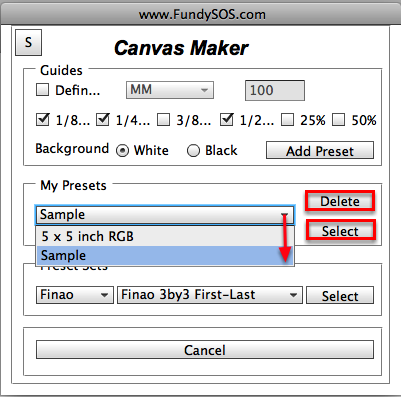
After you set up your custom presets, you need to know how to use them. You can find all of your custom presets that you have created inside of canvas creator. Under "My Presets", use the drop down to select the preset you just created. Once selected, you have the option of using or deleting the preset. To use, select your created preset and click "Select" . To delete, select your preset and click "delete".
Editing User Presets

To edit a preset after you make it, click the "Edit User List" button inside "Add New Preset" panel.
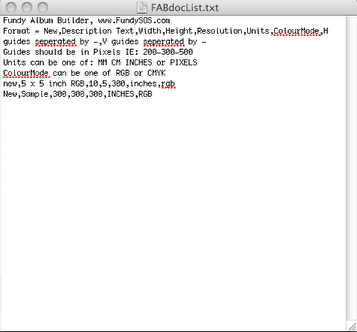
FABdocList.txt - Edit User List

After clicking the "Edit User List" button, the FABdocList.txt will open. This is what drives the user presets. From here you can edit, delete, or batch add your custom presets. The format is layed out like this:
New, Description Text, Width, Height, Resolution, Units, ColourMode
Example: new, Test Preset, 300, 500, 300, PIXELS, RGB - That would give you a doctument 300px wide by 500px tall. A resolution of 300dpi and RGB color space.